I thought it would be fun to put my step by step of making buttons. Here we GO!
I like to start by drawing all the characters on my 12x16 illustration paper.
I usually do 2 rows of 4. Mainly I try to keep it all in the same series but sometimes I don't want to draw 8 people from one series so I just mix them up. I like to use the COL-ERASE brand colored pencils for this part. I think colors Cormine Red and Light Blue work best.
After that I take the page and using Faber-Castell PITT artist pen type F. I go ahead and ink everything on the page.
Once I have everyone inked i go ahead and cut the pages into manageable squares. Mainly 2 characters per page this really helps when scanning and also helps the coloring proses. When you see 8 people on a page at once you just don't know where to start. 2 is a much more manageable number
*Commission Special* However when I'm at a convention and people request special buttons there is little space available. So instead of using the bigger paper I opt to using 8.5x11 sheets of computer paper to draw 3 characters per page. I then ink and scan as normal. I also try and keep like characters on the same page. I can frame these and sell them later as is. People like that kinda stuff.
I then go about scanning the images one by one. This is probably the most boring part in the whole sequence. I scan everything as 300dpi black&white .bmp files. This is so I don't have to worry about cleaning or erasing the red or blue lines created in the penciling proses.
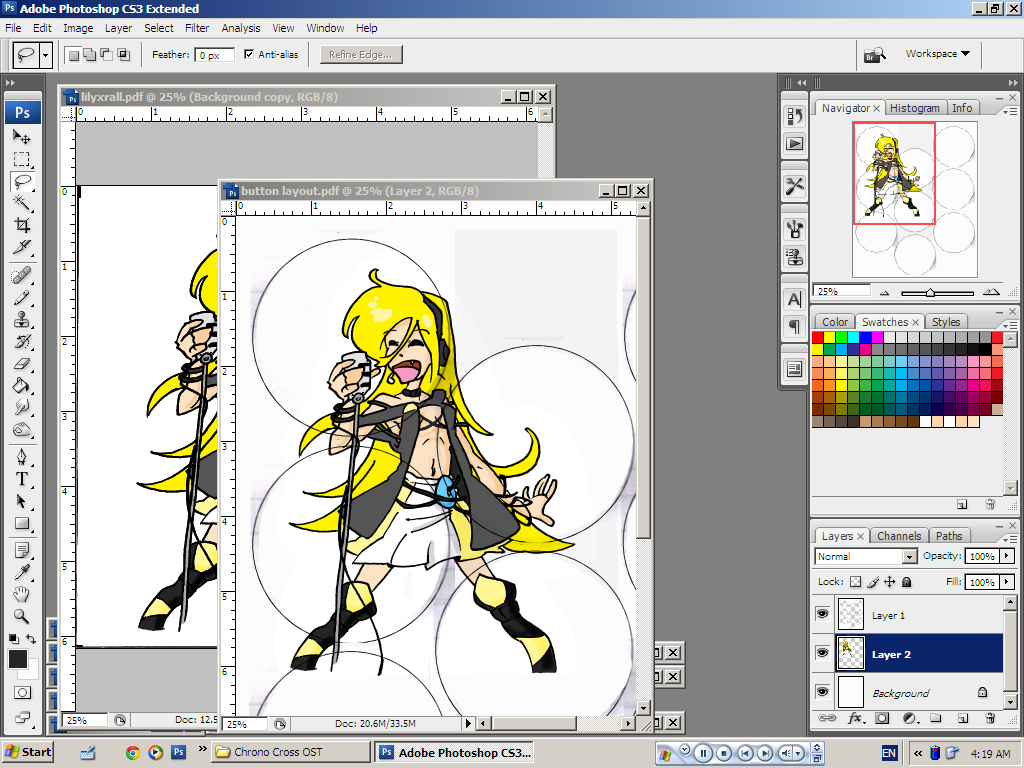
Now that I have all my pics in the computer its time to convert them into manageable file types. You cant do much with a .bmp so first I have to change the color settings from b&w to RGB color. This smooths out the lines and makes it possible to create layers in photoshop.
Next step is to duplicate the layer give it the multiple setting and start coloring. For this proses I found it easier to write the colors of their clothes on the paper while I'm drawing them so I don't have to keep looking at my reference materials when I get to this step.
After all the coloring is done I can now copy and paste the image into my button template. The template has 9 circles that are preset for perfect buttons every time.
Next i must re size and trace the image. By the time I get to this step allot of the work is done and I'm really just clicking and using ctrl+t allot.
Once its been fitted into the space I just add a random color to the background. I usually try to find a color that will contrast with the Character to make them pop. But its mostly just random.
Once I get all 9 circles filled I can now print the page. I usually print 3 of each button to start. My computer and printer is always on hand at conventions just in cast I need to make more.
Next is another one of those boring bits, cutting out the circles. It doesn't seem so bad at first but if you remember each page has nine buttons and I print 3 pages of each sheet. That alone is 27 cuts not to mention I usually make at least 20 or more button designs at once a combined total of over 60 cuts!
However once I'm done with the cutting I get to one of my favorite steps. Constructing the buttons! I use a 2.25 professional button maker that makes buttons in 30 seconds. Not to mention its supper fun to see them come out looking all awesome and stuffs. It takes some time to get them all made but I really enjoy this step.
The very last thing I do is put my signature on the back of the buttons before putting them away.
And that's how I make buttons. I hope you enjoyed the Tutorial,
later pyons


1 comment:
sweet!!!
Post a Comment